
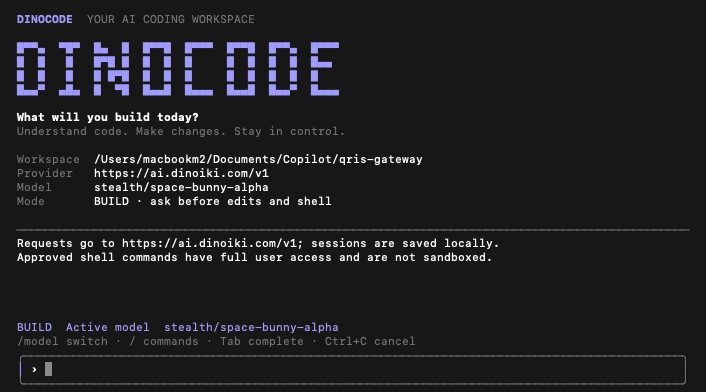
Dinocode is a revolutionary AI coding assistant designed specifically for your terminal, powered by Dinoiki. With an approval-based safety system and the ability to explore projects directly from your terminal, Dinocode brings AI-assisted coding to the next level. With support for over 80+ AI models from various providers, Dinocode offers unprecedented flexibility in choosing the right tool for every coding task. This comprehensive guide covers everything you need to know about Dinocode, from installation to advanced usage.
What is Dinocode? A Complete Introduction
Dinocode is an AI coding assistant purpose-built to work directly in your terminal. Unlike IDE extensions or web-based tools, Dinocode brings artificial intelligence to the command-line environment that developers already know and love.
Dinocode empowers you to:
- Understand code structure and project architecture deeply
- Make file changes securely through an approval system
- Execute shell commands with complete control
- Choose from 80+ AI models best suited for your task
- Keep all your work transparent and under your control
With seamless integration into your favorite terminal (zsh, bash, and others), Dinocode brings development productivity to unprecedented levels.
Core Features of Dinocode
1. Interactive Project Exploration
Dinocode enables you to read files, search code, and ask questions about how different parts of your project work together. This is incredibly useful when you:
- Work with unfamiliar codebases
- Need to understand complex application architecture
- Want real-time documentation of the code you're developing
- Onboard new team members quickly
Simply navigate to your project directory and start a conversation with Dinocode.
2. Approval-Based Safety System
The most important security feature of Dinocode is its approval-based system. Before Dinocode makes file changes or runs shell commands, you'll be prompted to:
- Review the changes that will be made
- Approve by pressing 'y'
- Reject by pressing Enter
This ensures that AI never makes changes you don't want or don't understand. You maintain complete control.
3. 80+ AI Models at Your Fingertips
One of Dinocode's standout features is support for 80+ AI models from multiple providers. You can:
- List available models with
dinocode models - Switch models during a conversation using
/model - Choose the perfect model for your specific task
- See your active model displayed at all times
Supported providers include:
- Dinoiki AI API - Default provider with optimized models
- OpenAI-compatible APIs - Use any OpenAI-compatible endpoint
- Multiple model families - From specialized coding models to general-purpose LLMs
The flexibility to choose 80+ models means you can:
- Use lightweight models for quick analysis
- Leverage powerful models for complex refactoring
- Switch between providers based on your needs
- Optimize for both speed and cost
4. Read-Only Mode for Safe Exploration
When you want to explore a project without risking file modifications or shell execution, use the --read-only flag:
bash
dinocode --read-only
This mode is perfect for:
- Learning new codebases
- Conducting code reviews
- Analyzing projects without making changes
- Onboarding and exploration
5. Powerful Session Management
Dinocode stores session history locally, allowing you to:
- Resume previous conversations with
dinocode sessions - Return to the same workspace and provider
- Continue discussions without losing context
- Maintain work continuity across sessions
6. Non-Interactive Mode for Automation
For CI/CD pipelines and automation tasks, use dinocode run to:
- Execute one-shot tasks
- Process piped input
- Perform batch analysis
- Integrate with scripts and workflows
7. Multi-Provider Support
Dinocode isn't locked to a single provider. Use OpenAI-compatible APIs from:
- Custom API providers
- On-premise solutions
- Alternative AI services
- Your own infrastructure
System Requirements and Installation
Prerequisites
Before installing Dinocode, ensure you have:
- Node.js 22 or later
- npm (Node Package Manager)
- Stable internet connection
- Dinoiki API key with access and quota for your chosen model
Compatible with:
- macOS
- Linux
- Windows (with npm)
Installation Methods
Method 1: NPM Installation (All Platforms)
The most straightforward way to install Dinocode:
bash
npm install -g dinocode
This command installs Dinocode globally, making it accessible from any terminal.
Method 2: Shell Installer (macOS & Linux)
If you prefer a script-based installer:
bash
curl -fsSL https://dinoiki.com/install.sh | sh
Important: Always inspect the installer script before running. The script requires:
- Node.js 22+
- npm already installed
- curl and POSIX shell
The script installs to $HOME/.local by default without requiring sudo.
Adding to PATH (If Needed)
If your terminal can't find dinocode after installation, add it to your PATH:
bash
export PATH="$HOME/.local/bin:$PATH"
Add this to your shell configuration file (.bashrc, .zshrc, etc.) to make it permanent.
Setting Up Your API Key
After installation, connect your API key:
bash
dinocode auth login
You'll be prompted to enter your API key at a hidden prompt. The key is saved in your local configuration, not in your project.
Default endpoint: https://ai.dinoiki.com/v1
Note: Login saves your key but doesn't validate chat access at that moment.
Getting Started
Navigate to your project directory:
bash
cd /path/to/your/project
dinocode
If you haven't configured a default model, the first launch opens a searchable model picker where you can:
- Type to search among 80+ models
- Use arrow keys to navigate
- Press Enter to select your preferred model
Tip: Start with a simple prompt like "Explain this project's structure" to get familiar with the interface.
How to Use Dinocode: Complete Guide
1. Read-Only Exploration Mode
To explore your project without making changes:
bash
dinocode --read-only
Use this mode for:
- Understanding project architecture
- Searching for bugs or security issues
- Performing code reviews
- Learning unfamiliar codebases
2. Build Mode (Editing & Execution)
To make file changes and run commands:
bash
dinocode
In Build mode, you must approve:
- File edits
- Shell command execution
Workflow:
- Make a request for changes
- Review the proposed modifications
- Press 'y' to approve or Enter to deny
3. Switching AI Models
During a conversation, switch between 80+ models with:
/model
This opens the model picker allowing you to:
- Search for specific models
- See which model is currently active
- Switch to another model mid-conversation
4. Resuming Previous Sessions
View saved sessions:
bash
dinocode sessions
Resume a specific session:
bash
dinocode --resume SESSION_ID
5. Non-Interactive Tasks
For automation and scripting:
bash
dinocode run --model MODEL_ID "Your prompt here"
Or with piped input:
bash
cat file.txt | dinocode run --model MODEL_ID
Real-World Use Cases for Dinocode
1. Quick Onboarding to New Codebases
When joining a new team or project, Dinocode helps you:
- Understand project structure quickly
- Learn naming conventions and patterns
- Identify key files and dependencies
- Ask specific questions about complex logic
2. Code Refactoring and Modernization
Dinocode assists in refactoring by:
- Explaining legacy code
- Suggesting improvements
- Making changes with your approval
- Testing modifications before committing
3. Debugging and Troubleshooting
Find and fix bugs efficiently:
- Explain error messages
- Trace code execution flow
- Suggest targeted fixes
- Implement and test solutions
4. Automated Documentation Generation
Dinocode can help generate:
- README documentation
- API documentation
- Code comments and docstrings
- Architecture diagrams and documentation
5. Comprehensive Code Review
Use read-only mode for:
- Reviewing pull requests
- Identifying potential issues
- Suggesting improvements
- Ensuring adherence to best practices
6. Performance Optimization
Identify and optimize performance bottlenecks:
- Analyze algorithm complexity
- Suggest optimization strategies
- Implement efficient solutions
- Benchmark improvements
Understanding Model Selection: 80+ Options Explained
One of Dinocode's greatest strengths is access to 80+ AI models. Here's how to choose wisely:
Model Categories
Coding-Specialized Models:
- Optimized for code understanding
- Better at technical explanations
- Excellent for file generation
- Best for refactoring tasks
General-Purpose Models:
- Versatile across different tasks
- Good for documentation
- Suitable for analysis
- Better for creative problem-solving
Speed-Optimized Models:
- Faster response times
- Lower API costs
- Good for quick analysis
- Suitable for repetitive tasks
Power Models:
- Highest accuracy
- Best for complex reasoning
- Superior code quality
- Ideal for critical tasks
How to Choose Your Model
- List available models:
bash
dinocode models
- Consider your task:Simple analysis? Use a lightweight model
- Complex refactoring? Use a powerful model
- Quick review? Use a fast model
- Critical changes? Use a premium model
- Monitor costs:Check provider pricing
- Balance quality vs. cost
- Switch models as needed
- Experiment:Try different models for the same task
- See which works best for your workflow
- Build your preferred setup
Security and Privacy: What You Need to Know
Read-Only vs. Build Mode
Read-Only Mode (--read-only):
- Files cannot be modified
- Shell commands cannot be executed
- Completely safe for exploration
- Note: Code read is still sent to your provider
Build Mode:
- File edits require your approval
- Shell commands require your approval
- Commands run with your user access
- Not sandboxed
Data Privacy Considerations
What Gets Sent to Your Provider:
- Your prompts and conversations
- File content read by Dinocode tools
- Tool results and outputs
- Complete conversation history
Critical: Don't share confidential code, API keys, or proprietary information.
Local Storage Security
Sessions and Configuration:
- Sessions stored locally may contain code and command output
- API keys stored in plaintext in local config (not encrypted)
- Protect your configuration directory carefully
- Review all changes before committing
Best Practices:
- Secure your local configuration directory
- Review all changes before committing to version control
- Run test suites before trusting generated results
- Use
.gitignoreto exclude sensitive files - Rotate API keys regularly
- Monitor API usage for unauthorized access
Using OpenAI-Compatible Providers
Dinocode isn't limited to Dinoiki. Use any OpenAI-compatible provider:
Setting Up a Custom Provider
- Configure the provider:Enter the provider's base URL
- Login with the provider's API key
- Provider Requirements:Must support model discovery
- Must support chat completions endpoints
- Should provide OpenAI-compatible responses
- Model Selection:Choose models that support tool calling
- Check provider documentation
- Verify pricing and rate limits
Popular Alternatives
- OpenAI API - GPT-4, GPT-3.5-turbo
- Azure OpenAI - Enterprise deployments
- Local LLMs - Self-hosted Ollama, LM Studio
- Alternative providers - Anthropic Claude, Cohere, etc.
Frequently Asked Questions (FAQ)
Q: What does Dinocode cost?
A: Dinocode itself is free. However, using the AI API incurs charges based on your chosen provider and model. For the default Dinoiki endpoint, check AI API pricing and ensure your API key has sufficient quota. Using lighter models and read-only mode can help reduce costs.
Q: Which of the 80+ models should I use?
A: Use dinocode models to list available models. For coding tasks, choose models that support tool calling. Consider:
- Speed: Lightweight models for quick analysis
- Quality: Powerful models for complex tasks
- Cost: Balance capabilities with pricing
- Specialty: Use coding-specific models when available
Q: How do I update Dinocode?
A: Updates are manual. Use the same method you used to install:
bash
npm install -g dinocode@latest
Then restart Dinocode and verify the version:
bash
dinocode --version
Updates don't delete your local configuration or saved sessions.
Q: Is Dinocode available for Windows?
A: Yes! Use npm to install Dinocode on Windows. An interactive terminal is recommended for smooth conversations and approvals.
Q: Can I use Dinocode in CI/CD pipelines?
A: Yes! Use dinocode run for non-interactive tasks:
bash
dinocode run --model MODEL_ID "Analyze this project"
Remember that non-interactive tasks cannot approve file edits or shell commands.
Q: How do I integrate with my existing tools?
A: Dinocode can:
- Read output from other CLI tools
- Accept piped input
- Generate output compatible with scripts
- Be wrapped in custom shell scripts for integration
Q: What if I have connection issues?
A: Troubleshooting steps:
- Verify internet connection
- Check API key validity
- Confirm provider endpoint is accessible
- Check rate limits haven't been exceeded
- Review firewall/proxy settings
Q: Can I use multiple API keys?
A: Currently, Dinocode stores one key at a time. To switch:
bash
dinocode auth login
Consider having separate keys for different projects or usage levels.
Comparison: Dinocode vs. Alternatives

Best Practices and Pro Tips
1. Start with Read-Only Mode
When exploring a new codebase, always start with --read-only to safely understand the structure.
2. Craft Specific Prompts
Instead of "Fix bugs", try "Analyze the authentication module for SQL injection vulnerabilities and suggest hardened implementations."
3. Always Review Before Approving
Take time to read changes carefully before approving execution.
4. Test Before Committing
Run your test suite completely before committing AI-generated changes to your repository.
5. Monitor Your API Usage
Track your API consumption and set alerts to avoid unexpected charges.
6. Leverage Sessions for Continuity
Save sessions to maintain context across multiple work sessions.
7. Match Model to Task
- Use faster models for quick analysis
- Use powerful models for complex refactoring
- Use specialized models for specific domains
8. Create Custom Workflows
Wrap Dinocode in shell scripts for repetitive tasks:
bash
#!/bin/bash
# analyze.sh - Automated code analysis
cd "$1"
dinocode run --model claude-3-opus "Perform comprehensive code analysis and generate security report"
9. Use Environment Variables
Automate model selection and provider configuration with environment variables.
10. Document Your Preferences
Keep notes on which models work best for which tasks in your team.
Advanced Workflows
Workflow 1: Complete Onboarding Process
bash
# Start with read-only exploration
dinocode --read-only
# Questions to ask:
# - "Explain the project structure"
# - "What are the main dependencies?"
# - "How does the authentication work?"

# Then switch to build mode for specific improvements
dinocode
# - Suggest improvements to code quality
# - Implement suggested changes
# - Add documentation
Workflow 2: Code Review at Scale
bash
# Review multiple files
for file in src/**/*.js; do
  dinocode run --model claude-3-sonnet "Review $file for best practices and security issues"
done
Workflow 3: Automated Documentation Generation
bash
# Generate comprehensive documentation
dinocode run --model claude-3-opus "Generate complete API documentation in Markdown format from this codebase"

# Generate unit test stubs
dinocode run --model claude-3-sonnet "Create test stubs for all functions matching project conventions"
Conclusion: Why Dinocode Stands Out
Dinocode represents a paradigm shift in AI-assisted development. With its unique combination of:
- Terminal-native interface - Work where you're most productive
- Approval-based safety - Maintain complete control
- 80+ AI models - Choose the perfect tool for every task
- Privacy-conscious design - Your data stays private
- Flexible provider support - No vendor lock-in
- Session persistence - Maintain work continuity
Dinocode is ideal for:
- Developers working with unfamiliar codebases
- Teams prioritizing security and transparency
- Developers who prefer command-line tools
- Organizations requiring flexible AI provider selection
- Projects requiring cost optimization through model selection
Key Advantages Over Competitors
- True Terminal Integration - Not just a wrapper, but deeply integrated
- Model Flexibility - 80+ models vs competitors' limited selection
- Approval System - Unique safety feature for controlled automation
- Provider Agnostic - Use any OpenAI-compatible API
- Transparent Pricing - Know exactly what you're paying for
Getting Started Today
- Install Dinocode:
bash
npm install -g dinocode
- Get Your API Key: Get Dinoiki API Key
- Login:
bash
dinocode auth login
- Start Exploring:
bash
   cd /your/project
   dinocode --read-only
Next Steps
- Explore the full documentation
- Join the community
- Share your workflows and improvements
- Report issues and suggest features