Get to know a codebase.
Read files, search for code, and ask how the pieces work together. Explore an unfamiliar project through a conversation.
Read, search, understand
Dinocode Terminal AI assistant
Understand code, make changes, and choose your model — right from your terminal. Powered by Dinoiki. You stay in control.
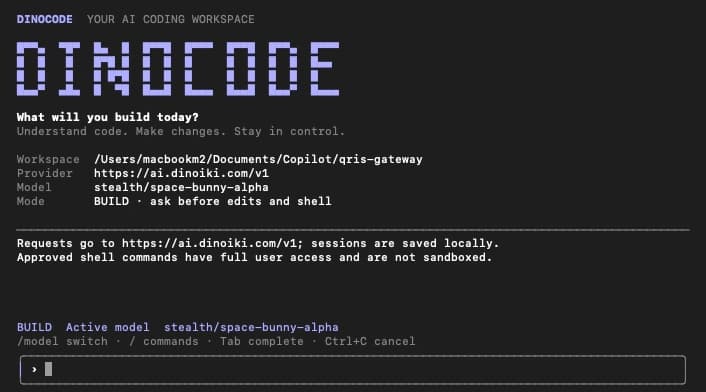
Your workspace, model, and permission mode, all in view. Start a conversation from the directory you want to work in.
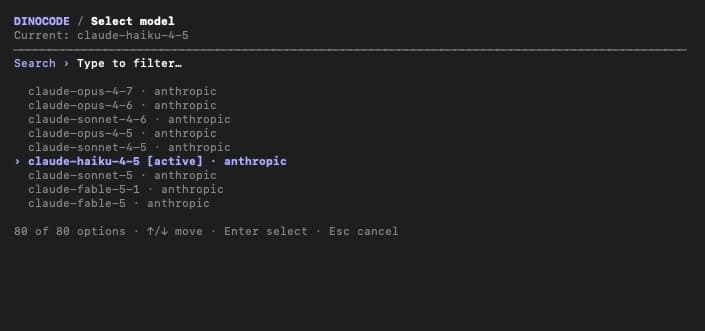
Type to find a model. Use the arrow keys to browse and Enter to select. Models are discovered from your provider; availability can change.
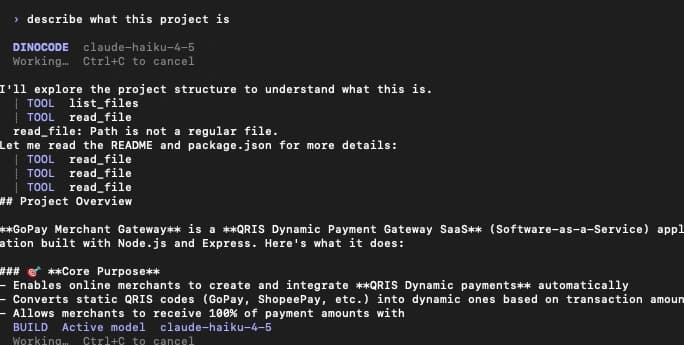
Ask about a project in plain language. Dinocode reads and searches your workspace to help explain how the pieces fit together.
Explore first. Approve edits and shell commands before they run.
A few commands to get started. Bring Node.js 22 or later, npm, an internet connection, and a Dinoiki API key with access and quota for your chosen model.
Get your API keymacOS, Linux, and Windows with npm. Use an interactive terminal for conversations and approvals.
Install the CLI with npm. Choose one installation method to avoid duplicate installations.
npm install -g dinocodeEnter your key at the hidden prompt. It is saved in your local configuration, not in your project.
dinocode auth loginThe default endpoint is https://ai.dinoiki.com/v1. Login saves your key; it does not validate chat access.
In your terminal, navigate to the project directory you want to explore, then explore your project with Dinocode.
dinocodeIf no default model is configured, the first interactive launch opens a searchable model picker. Try: “Explain this project’s structure.”
Ready to request changes? Run dinocode without the read-only flag. Review each action; press y to approve, or Enter to deny.
This command executes the downloaded script. Inspect the installer first (opens in a new tab) and only run it if you trust its contents.
curl -fsSL https://dinoiki.com/install.sh | shThe script requires Node.js 22+ and npm already installed. It installs under $HOME/.local by default, without sudo or edits to your shell profile. Windows users should use npm.
If your terminal cannot find dinocode, add the installation directory to your PATH:
export PATH="$HOME/.local/bin:$PATH"Add the same PATH setting to your shell configuration to keep it in new terminals. See the README for custom installation prefixes and version pinning.
Keep the conversation close to the code. Dinocode brings project tools, model selection, and your next question into the terminal you already use.
Read files, search for code, and ask how the pieces work together. Explore an unfamiliar project through a conversation.
Read, search, understandReview file changes and shell commands before they run. Approve an action when you are ready, or deny it and keep exploring.
Approval before actionSearch models from your provider and switch during a conversation. The active model stays visible above every prompt.
/modelExplore without allowing file edits or shell commands. Code read by tools may still be sent to your provider.
dinocode --read-onlyResume a locally saved session with the same workspace and provider URL. Choose your permission mode each time you launch.
dinocode sessionsUse one-shot tasks or pipe input for noninteractive analysis. Noninteractive tasks cannot approve edits or shell commands.
dinocode runUseful tools deserve clear boundaries. Know what is allowed, what is shared, and what stays on your machine.
Read the security notesUse --read-only to explore without those actions. In Build mode, file edits and shell commands require your approval. Approved shell commands are not sandboxed and run with your user access.
Prompts, file content read by tools, tool results, and conversation history used in requests are sent to the active provider. Do not include code or information you are not allowed to share.
Sessions are stored locally and can contain code and command output. Saved API keys are plaintext in the local configuration, not encrypted. Protect that directory, review changes, and run tests before relying on generated results.
A few things worth knowing. The npm README has the full command reference and troubleshooting guide.
Read the documentationNode.js 22 or later, npm, an internet connection, and an API key with access and quota for your model. Use npm on macOS, Linux, or Windows. The optional shell installer requires curl and a POSIX shell; it does not install Node.js or npm.
Yes. Dinoiki is the default, but Dinocode supports configurable OpenAI-compatible APIs. Your provider should expose model discovery and chat completions. Configure its base URL and log in with that provider’s key; see the README for setup details.
Use dinocode models to list your provider’s models, or /model during a conversation. For coding tools, choose a model that supports tool calling. Model availability, capabilities, and pricing depend on your provider; the screenshots show examples, not a fixed catalog.
Requests use your active provider and API key. Usage charges and limits depend on the provider and model you select. For the default Dinoiki endpoint, review the AI API pricing and make sure your key has sufficient quota.
Use dinocode run for one-shot tasks and piped input, with a configured model or --model MODEL_ID. Noninteractive tasks cannot approve edits or shell commands. To resume, list sessions with dinocode sessions and launch with --resume SESSION_ID, using the same workspace and provider URL. Select read-only mode again if needed.
Updates are manual. Use the same method you chose when installing. For npm installations:
npm install -g dinocode@latestFor a script installation, rerun the installer with the same prefix and the latest version. Restart Dinocode, then check dinocode --version. Updating does not delete your separately stored configuration or sessions.
Your next conversation can start in your terminal.
Explore the Dinoiki AI API